Tuesday, April 26, 2011

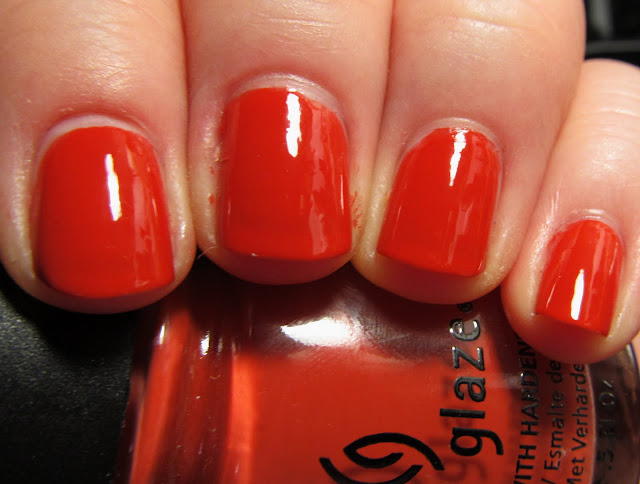
China Glaze Life Preserver

Along with Grape Pop, which I showed yesterday, China Glaze also sent me the orange creme from their Anchors Away collection, Life Preserver. Just like Grape Pop, Life Preserver is a diva and refuses to photograph accurately, at least in the indoor lighting the weather has forced me to use. It's a dusty but vibrant, glossy orange creme, and while I would probably use three coats for a full manicure due to the slight VNL that I had with the two coats (without top coat) shown, two coats would also suffice.

indoors, artificial light

*sigh* Life Preserver is not that red. I think my camera is just mad at China Glaze for being so awesome. To get an idea of the actual color, look at these pictures, and then picture something between those swatches and mine. It's quite a unique orange, and I definitely don't have anything close to it in my stash. I'll have to bring it back out when the storms stop (though it doesn't look like that will be anytime in the near future) and take (hopefully) more accurate pictures.

I received this product from the manufacturer for review; however, that will never affect what I say about the product. For more information, see my disclosure policy.

Monday, April 25, 2011

China Glaze Grape Pop

Today I have China Glaze Grape Pop to show you. I got this from China Glaze's PR company a while back, and I had pretty high expectations. I've always found China Glaze polishes to have excellent formulas and lovely colors, so I expected Grape Pop to follow that precedent. And guess what? It has an excellent formula, it's a lovely color - but not only that. I think China Glaze Pop is my perfect purple creme.

indoors, artificial light

Of course, like most purples, Grape Pop is a diva and refuses to be photographed accurately. It's warmer than it appears in the picture, and my skin is not that jaundiced. Appropriately, Grape Pop is a very grapey purple, and it's also very glossy. I used two coats without top coat in the picture. I probably wouldn't have gone out and bought this on my own because I would have though that it's "just a purple creme." However, I'm so glad that China Glaze sent it to me, because this not just a purple creme, but my favorite purple creme.

This product was provided to me by the manufacturer for review; however, this will never affect what I say in a review. For more information, please see my disclosure policy.

Sunday, April 24, 2011

Spring Frankens

Happy Easter! Go grab a Cadbury egg and come back.

Are you back? Okay, so last month sometime (I am clearly bad about posting things in a timely fashion), I made a set of four frankens as a spring collection of sorts. I decided I wanted four pastel-ish colors with subtle shimmer, and I made a pink, a peachy orange, a green, and a blue. The shimmer was indeed quite subtle and my camera pretty much failed at capturing these colors, but here we go anyway. All of these pictures were taken indoors under artificial light.


First, we have the green. As far as cooperating with the camera, this one definitely gets first place - the picture is actually color-accurate, and though it's hard to see the shimmer, it is there in the picture if you click to enlarge it, and it's definitely there in real life. I used three coats of this one without top coat, and as you can see, it's nice and shiny on its own.


Now we have the orange, which in my opinion is the fail of the collection. The shimmer both gets lost in the polish and is present enough to give it a chunky, gloopy texture that doesn't completely level even with the two coats of polish and one coat of Seche Vite that I used in the picture. This one isn't completely color-accurate, either; it's more orange and intensely colored than the picture shows.


This pink, on the other hand, is quite the success in my opinion. It's a bit more salmony than in the picture and the gold shimmer is more evident in real life. I used two coats without top coat in the picture.


*sigh* This blue...it's very pretty in real life, but it just refused to cooperate with my camera. Think more dusty periwinkle, and the shimmer in considerably more evident in real life. I used three coats without top coat.

I haven't named any of them yet (I am also clearly bad about naming my frankens in a timely fashion), so I'm asking all of you for some help. I don't like any of the names I've come up with so far, so if you have any ideas please leave them in the comments. Thanks, and again, have a very happy Easter!

Saturday, April 23, 2011

Easy Peasy Lava Nails

Today I have a decidedly non-Eastery (well...unless you're going for a Good Friday/Holy Saturday look, I suppose) manicure to show you. I've been intending to do lava nails for some time, and I finally did. Fortunately, I absolutely love them! I can't stop looking at my nails, which, while vain, is how I know when I've done something I'm really satisfied with. For your benefit, I took pictures along the way and did a little tutorial. First, here's the finished product:

indoors, artificial light

I think it looks pretty cool! My favorite thing about this manicure, though, is that it's stupidly easy to do. I kid you not - all you absolutely have to have that some people might not is a black or grey crackle nail polish. Here are the steps, and you can click on the pictures to enlarge them if you like. I left them as small as possible to avoid making the post a bazillion miles long.


1) Apply base coat - this is especially important because you're using colors that tend to stain - and a red base. I used Ulta Silk Wrap Base Coat and one coat of OPI Red My Fortune Cookie, which is my absolute favorite red. I'm not sure what the black dot on my nail is, but I left it alone since I knew I'd be covering it up anyway. Also, sorry for my gross-looking fingers throughout this post.


2) Splotch on some orange. I used a dotting tool and OPI A Good Man-darin is hard to find, but you could use just about anything since you're not going for perfect, round dots - a pencil eraser, the head of a pin, a toothpick - use your imagination if you have to. :)


3) Splotch on some yellow in the same fashion. I used Nina Ultra Pro Like Butta. As you can see, the design kind of looks like crap at this point, which is the beauty of the whole thing - this really isn't nail art.


4) I clearcoated the whole nail with Wet n Wild Clear to keep the final product from looking quite so lumpy and to ensure that the crackle would crack properly, but that's really a matter of personal preference. You can probably skip this if you choose.


5) Crackle time! I used China Glaze Black Mesh, but you could use any other black crackle, and I imagine China Glaze Cracked Concrete would look good as well. As with any crackle manicure, try to work quickly and use even strokes.


6) Clean up your fingers with polish remover, add top coat (I used Seche Vite), and ta da! You're done. *looks around for obnoxious red button* *pushes* That was easy! Now go show off your fierce lava nails to all your friends.

Friday, April 22, 2011

National Brain Tumor Awareness Month

My apologies for not posting since Monday - part of the reason is that I've been busy, and part of the reason is that I didn't feel much like blogging and didn't want to force it. I'll be back to regular polish posts tomorrow (though it won't be an Easter manicure...not even close), but I wanted to post about something that I've been thinking about since Colour Coated started her blue manicures for Autism Awareness Month. I'm kind of nervous to talk about it on here, but here we go.

May is National Brain Tumor Awareness Month, and I have a brain tumor - a pituitary adenoma, to be precise. I've had three surgeries and radiation and I'm pretty much stable now, though I still have to take a ton of medicine and practice healthy habits. Anyway, the point is that I want to do something for National Brain Tumor Awareness Month, especially because it also happens to be my birth month (my birthday is May 6), and I'd love it if some of you would join me.

Grey is the color of National Brain Tumor Awareness Month, so I'll be incorporating grey into every manicure I do in May. If you participate, you can do so to whatever extent you like - you can do one grey mani or one thousand, whatever suits you best.

I also plan to put a fact about brain tumors in every post during May, though I may run out of good ones by the end of the month. ;) If you would like to do the same, something similar, or just browse around for yourself, here are the fact pages I'll be using:

American Brain Tumor Association Brain Tumor Facts
Miles for Hope Brain Tumor Facts
Pediatric Brain Tumor Foundation: Facts about pediatric brain tumors
Justin's Quest Brain Tumor Facts
North America Brain Tumor Coalition Brain Tumor Facts

Also, feel free to grab the ribbon if you'd like to use it. :) Thanks for joining me if you are, and otherwise, thanks in advance for reading all my grey posts! I promise they won't be boring.

Monday, April 18, 2011

A Bit Dotty

The title of this post pretty much sums up the past week...my brain has been all over the place! At the choir festival, my school entered our concert choir, chamber choir, women's choir, and men's choir - I'm in all of them except men's choir - and all of our choirs won first place! That makes four years that all four of our choirs have won first place, so of course all the seniors were especially excited. :) During the trip, I wore the same manicure for all four days, though I added crackle after the first two. I pretty much copied Nail Polish Art Addiction's 99 Balloons manicure, except mine ended up a bit different. I used Sally Hansen All Fired Up, Sally Hansen Sun Kissed, Nina Ultra Pro Like Butta, Sally Hansen Green With Envy, Zoya Robyn, and Orly Purple Pleather for the dots, and Wet n Wild White Creme for the base.

indoors, artificial light

After two days, I had chips on a couple fingers, so I added a coat of China Glaze Black Mesh (I'd thought ahead and packed it specifically for that purpose). Sorry for the super crappy picture - I took the first one at home before I left, but I had to take this one in the hotel room, and the lighting was so dim that I couldn't get a clear picture. I thought I'd share it with you all the same, but be warned...it sucks.

indoors, artificial light

I added a coat of Seche Vite after I took the picture, and the crackle lasted until a few hours before I got home. I was really happy with this manicure, and I've already planned some variations, so look for more cracked dots sometime in the near future! :)

Sunday, April 17, 2011

Franken: Orchid

You know how lots of purples hate being photographed and always try to disguise themselves? Well, this is one of those. It's pinker than it looks in the picture, and it has a subtle shimmer that doesn't show in the photos - it's sort of there in the bottle shot, but it's more apparent in real life. Orchid has a jelly finish, but it's not one of those jellies that will never be opaque, either. I used three coats on all but my index finger, which I used four on because I smudged that nail after the third coat. I didn't use top coat in the pictures, and it's amazingly shiny even so.

outdoors, sunlight
 outdoors, shade
indoors, artificial light

The odd thing about this franken is that I used two polishes, Ulta Devious and NYC 215, and neither one of them appear to be shimmers when worn on their own. However, my franken has shimmer! It must have been lurking in 215, because I'm quite positive that Devious is a creme, but I sure never saw it when I wore the polish on its own. Maybe it showed up because I frankened the polish into a jelly? Who knows - however it happened, I like the result.

Saturday, April 16, 2011

Franken: I Am Not Yours

Today I have another Autism Awareness Month blue for you, and this time it's a franken - a choir franken, in fact. I started out wanting to make a jelly blue with silver glitter, and when I got done it reminded me of a line in a song we sing in choir called "I Am Not Yours" (the lyrics are a poem by Sara Teasdale), so that's what I named the polish. In case you're curious, the line is "Oh plunge me deep in love, put out my senses, leave me deaf and blind." Anyway, here it is at three coats with Seche Vite (which gave me a bit of shrinkage, as you can see):

outdoors, sunlight
indoors, artificial light 
outdoors, shade

I didn't take a bottle shot because the bottle I used (an old Seche Rebuild bottle) was made of foggy glass, and unfortunately you can't see the holographic bits, but I hope you get a good idea of what this polish is like nonetheless. For some reason I didn't write down the polishes I used when I made this like I usually do, but my best guess and remembrance is that I used Icing Electric Feeling, Wet n Wild Kaleidoscope, China Glaze Fairy Dust, Wet n Wild White Creme, and Wet n Wild Clear. I'm reasonably happy with this franken, though I feel like it lacks something at times...we'll see.

Friday, April 15, 2011

Franken: Coral Island

I made this franken quite a while back when I realized that I liked coral, and I liked glitter, and I did not have a coral glitter. A week or so later, Cult Nails announced Captivated, which is a coral glitter...so I guess Maria and I were seeing the same deficit. :) However, Coral Island is not a whole lot like Captivated - the glitter in it is a bit different, and there's more glitter in Captivated. I used three coats here to give Coral Island more depth and to completely eliminate VNL, but one could probably use two and be fine. To make Coral Island, I used Sephora by OPI Cover Me in Petals, OPI Hot and Spicy, clear, Love My Nails Angel Baby, Sinful Colors Pinky Glitter, Sephora by OPI Only Gold for Me, and China Glaze White Cap.

indoors, artificial light

This did not show up well in pictures at all...it was rainy when I wore it, so I'm thinking I may have to take this one out on a spin when it's sunny and re-blog it. However, this is what I have for now, and at least the bottle shot is somewhat accurate.

Thursday, April 14, 2011

Jewel of a Lighthouse

Cheesy title! I never know what to name these layering posts, especially if I use a gazillion polishes. I only used two this time - Color Club Jewel of a Girl and China Glaze Lighthouse. I did this combination because I put on two coats of Jewel of a Girl, which is a burgundy/brown shimmer, and didn't like it nearly as well as I did in the bottle, so I thought, "Hm, what can I do with this?" So I topped it with a coat of Lighthouse.

outdoors, shade

Much better! I did take pictures of this inside and in sunlight, but none of those looked anything like what the combination looks like in real life, so I deleted them. Even though Lighthouse is a yellow polish, I feel like it adds a gold foil finish to Jewel of a Girl...whatever it does, I like it! I'm considering putting Jewel of a Girl on my swap list, but now that I've found out how great it looks with Lighthouse, I'm having to consider it more carefully. :)

Wednesday, April 13, 2011

Pink Wednesday: Cracked Marble

To learn more about Pink Wednesdays, go to the official On Wednesdays We Wear Pink website.

My water marble chipped yesterday afternoon, and I decided to add some China Glaze Broken Hearted (Thank you, Jasmine!) to it because I wasn't entirely ready to take it off yet. Unfortunately, half the polish on my thumbnail peeled off in the shower after I did the manicure, so I never actually wore this out in public. However, I will definitely have to try crackling over a water marble again, because I think this looks really cool! I was a bit iffy on it first, but I quickly grew to love it. I think it looks especially cool on my middle fingernail.

indoors, artificial light

Now for some blog housekeeping blogkeeping matters. I'm leaving for Chicago in the morning, as my high school choir is going to the Heritage Festival there for our big competition of the year. I won't have my computer with me and I probably won't even have time to change my nail polish (I hope it doesn't chip!), so I'm going to schedule posts for Thursday, Friday, Saturday, and Sunday...somewhere in the middle of all the laundry and packing I'm doing. I'll have three frankens and a layering mani for you, so I hope you'll enjoy them!

Tuesday, April 12, 2011

First Water Marble!

Sunday night, I decided to attempt my first water marble, which I'd been intending to do for quite a while. I used black and white (Wet n Wild Black Creme and White Creme) because I figured they'd be the easiest colors for a beginner like myself to marble with, and I marbled them over a base of one coat of White Creme. I used Vaseline to keep the polish from sticking to my fingers, and topped my nails with one coat of Seche Vite when I was done.

indoors, artificial light

I'm really sorry about my janky dry fingers and general nastiness in this picture - I took it this morning in a hurry because I was afraid my manicure wouldn't last the day without chipping, and I was right. While there are definitely some things for me to improve on, I don't think this was too bad for my first try, and I was happy to wear it out in public for two days. Have you tried water marbling?

Monday, April 11, 2011

Franken: Tatiana

Today the polish I have for you is an "accident" franken - I made it by trying to come up with another color, then failing and doing something else instead. I was trying to make a pale gold by combining a Charlotte Russe gold, Nailene white, China Glaze Golden Enchantment, and Orly Luxe, but it was turning out like a dupe of China Glaze Classic Camel, which wasn't what I wanted. So, I added a little bit of Orly Enchanted Forest (which is a dark evergreen color) and got this. I realized that the finish looked very similar to Rescue Beauty Lounge Catherine H, so I put that on my thumb.


 indoors, artificial light
 outdoors, shade
outdoors, sunlight

Isn't she pretty? :) I hope you can see what I mean about Tatiana being similar to Catherine H. In fact, I named Tatiana Tatiana because of the connection. Rather than English royalty, I named my franken after Russian royalty - Tatiana was the third (I think?) daughter of Tsar Nicholas II, the last tsar of Russia. Aside from color, Tatiana is also similar to Catherine H in that they're both quite opaque. I can usually get away with one coat of Catherine H, and I used two coats of Tatiana. They even both dry to a semi-matte finish, which is why I topped all of my nails with Seche Vite in the photos.

I hope your Mondays are all going well!

Saturday, April 9, 2011

Autism Awareness Blue: Robyn's Birthday

My fact for the day: About 1 in 150 children have Autism Spectrum Disorder. (American Academy of Pediatrics) My polish? I got Deborah Lippmann Happy Birthday, one of my biggest lemmings, from Apothica with a gift card that I won in a giveaway. When it arrived, I wasn't quite sure what I wanted to do with it now that it was all mine, but I eventually put it on top of Zoya Robyn and added Essie Matte About You.

indoors, artificial light

I'm in love! Deborah Lippmann Happy Birthday does everything for me that Milani Gems and Wet n Wild Party of Five Glitters did not. The orange and yellow glitter are there, and it really does look like a birthday party puked on my nails. That's my short post for the day...the sun is out, so I'm busy swatching! Have a great weekend!

Thursday, April 7, 2011

Random Mani Challenge

Tuesday, Lacquer Ware for Tips and Toes posted a challenge tag, and I chose to participate. The challenge is as follows:

1. Go to your lacquer stash
2. Close your eyes and pull 3 random items - JUST 3
3. Create a mani from them
4. Post your mani when you post the tag
5. Tag 3 bloggers


So, I did! The three random polishes I picked (knocking several others over in the process, since I had my eyes closed) were OPI Glow Up Already, Orly Happily Ever After, and BB Couture Pina Colada. At first, I had absolutely no clue what to do with them, but then my wheels started turning. Here are bottle shots of the three polishes in case you don't know what they look like (they're in the order above from left to right), and then the mani I came up with:

indoors, artificial light

While I didn't actually end up wearing this, I'm not unhappy with the way it turned out. I painted my nails with two coats of Glow It Up, then added one coat of Pina Colada and some dots (I used a dotting tool) in Happily Ever After. I like the muted look Pina Colada gives the glitter, and I'm definitely getting an Easter vibe. Sorry for the extra bits of pink on my ring finger - I messed up and was too lazy to start all the way over, so I just wiped off the pink. Or so I thought. I'm really glad Chris came up with this challenge, because I never, ever, ever in a million years would have combined these polishes on my own, but I quite like the result. I think I'll have to try something similar soon, with polishes of my own choosing. Here are my three tags:

Glitta Gloves (Kirsten and Nicole, I think you should both do it!)

However, if I didn't tag you and you want to do this, consider yourself tagged! Also, please feel free to leave links to your challenge manicure in the comments on this post - this is one time I won't mind link spamming, as I am really curious to see what everyone comes up with.

Wednesday, April 6, 2011

Pink Wednesday: Pink & Gold

I almost forgot today was Pink Wednesday, but fortunately I managed to pull something together for a pink post. I painted my nails with three coats of Milani Pink Out Loud, a bright hot pink with pink and gold glass-flecked shimmer, and then I added one coat of Sephora by OPI Only Gold for Me on top.

outdoors, shade
outdoors, sunlight

Neither of these pictures shows Pink Out Loud accurately - I think maybe that's because the gold glitter overpowering enough to throw my camera off, but I'm not sure. Anyway, you can still get the general gist from these pictures.

Just to let you all know, I may not be posting every day for a while. I still love blogging and plan to continue Never Unpolished for the forseeable future, I just don't feel like doing a post every day right now. I do still plan to post at least every other day, if not more often...I guess the point of this is just to tell you not to expect a post every day.

That's all for today - and guess what? It's getting closer and closer to Friday! :)

China Glaze Featured at Sue Wong Fashion Show


a model at Sue Wong wearing China Glaze China Rouge

OLD HOLLYWOOD FASHION AND MANICURES DAZZLE L.A.
China Glaze Manicures Backstage At The Sue Wong Fashion Show
Los Angeles, CA – (April 2011): “My Fair Lady” was the theme of Sue Wong’s Fall 2011 show that took place at her private residence in Los Angeles, CA. Paying homage to the Edwardian styling of the film and the overall theme of transformation, Sue Wong decided that China Glaze was the most fashion forward polish to compliment her collection that was filled with ornate gowns, rich satins, flowing chiffons and fine laces.
To accentuate the delicate appliqué and intricate embroidery seen on the dresses of her Fall 2011 collection, Sue herself decided that China Glaze Drastic (a dark, brick red) and China Rouge (a rich, creamy red) would fit the mood she was looking to set. All manicures were then topped off Seche Vite Fast Dry Top Coat for a high gloss shine. Celebrity manicurist Melissa Bozant and her assistants worked quickly to get the manicures done just in the time for the show to start!


China Glaze is free of DBP, toluene, and added formaldehyde.

China Glaze nail lacquers are available through salons and professional beauty supply stores nationwide. For more information, visit: www.chinaglaze.com or follow China Glaze on Twitter: http://twitter.com/ChinaGlaze

China Glaze is a division of American International Industries.

About American International Industries: For nearly 40 years, AII has been the leading manufacturer and worldwide distributor of innovative, quality beauty and skin care products for men and women. Our product lines include Ardell, Andrea, Body Drench, Bye Bye Blemish, Checi, China Glaze, Clean + Easy, Clubman/Pinaud, Duo, European Secrets, EzFlow, Fright Night, Gena, GiGi, Gypsy Lash, IBD, Jeris-Lustray, No Tweeze/Micro Tweeze, 'N Rage, Prolinc, RAW, Seche, SuperNail, Surgi-Care, Waterworks, Winning Nails, Woltra, Woody’s, and Youthair. For more information, visit our website: www.aiibeauty.com.

Tuesday, April 5, 2011

BB Couture A Touch of Greece: Apollo and Uranus

Hello, all! Today I'll be showing you Apollo and Uranus, the two polishes I received to review from the BB Couture A Touch of Greece collection. Apollo and Uranus are both from the men's part of the collection. Unfortunately, it was raining yesterday when I took these pictures, so I only have indoor pictures to show you - of course, today the sun is shining bright...and I don't have my camera with me.

In case you didn't know, Apollo was quite a busy god - he was the Greek god of music, poetry, plague, oracles, the sun, medicine, light, and knowledge. BB Couture Apollo is a bright orange, which I'm guessing comes from the fact that he was god of the sun/light. It's actually the only orange I have which is actually the color of a real orange. It's a little less vivid than the picture shows, but it's quite close. I really like the color and consistency, and though I wouldn't be surprised if there are dupes, I don't have any in my stash. Also, look at how shiny that is without top coat! I did have to use three coats to eliminate visible nail line, but as the application was absolutely perfect, I didn't mind.

indoors, artificial light

The second polish I was provided was BB Couture Uranus, which is a toffee, caramely brown color that I love despite the disparaging comments my mom made about its similarity to the color of...well...you can probably guess. Uranus is the Greek god of the sky and son of Gaia, the goddess of the earth. I only had to use two coats of Uranus, and it was just as incredibly shiny without top coat as Apollo was. I actually went ahead and wore this as my full manicure today because I loved it so much. The color isn't as yellowy as it looks in my pictures, though.

indoors, artificial light

So there they are, Apollo and Uranus! What do you think? 

These products were sent to me by Overall Beauty for review. However, this will never affect what I say about a product. For more information, see my disclosure policy.

Monday, April 4, 2011

China Glaze Atlantis

Very very quick post today, as I have to be off to school in about two minutes. Believe me, I'd much rather stay at home and blog all day, but I do want to graduate. :P Anyway, today I'm showing you China Glaze Atlantis.T he sun wasn't out when I wore it by itself, and my camera refused to take accurate pictures indoors, but I'm showing it to you anyway. Atlantis is a teal jelly with silver and holo glitter suspended in it. I used four coats - it didn't really need four, but I added an extra coat because I wanted lots of depth and sparkle. I took one picture in focus and one blurry picture so you could see the holo better.


indoors, artificial light

Okay, that's all! Have a great Monday!

Sunday, April 3, 2011

Atlantic Zebra

I wore China Glaze Atlantis for a couple days this past week, and after the first day I decided I wanted to add something. I settled on zebra stripes, so I freehanded some with a black Kiss striper. I'd never done zebra stripes before, and using Nail Polish Art Addiction's zebra stripe post as a guide, I think I managed to do pretty well.

indoors, artificial light
outdoors, sunlight
outdoors, shade

I did mess up on a couple of nails, but since I already had two coats of Seche Vite over Atlantis before I added the stripes, it was easy to remove the stripes without removing the glitter. This wasn't as easy for me to do as leopard spots, but it wasn't quite as hard as I thought it might be. I'll definitely be trying zebra print again in the future!

Finally, here's a new nail blog I've discovered this week - Claire is a nail tech in England and she does some impressive nail art.


P.S. I will be showing you Atlantis on its own soon, but I was so excited about this that I wanted to post it first!

Saturday, April 2, 2011

Beauty Manager App

Beauty Manager is an iPhone app by Nizx Software that allows users to keep a database of their makeup and beauty collection right on their phone. I was given the opportunity to try the app for free, and I was very excited - at the time, I was using Memeo Connect to allow me to view my Google Docs polish spreadsheets on my phone, and I was eager to try something that would be stored on my phone and wouldn't have to load each time I wanted to check my stash list. The app is $1.99. Here's what the app's page looks like in the iTunes App Store:


When you download and open the app, this is the home screen:


Since I'm a nail addict and don't really have an interest in keeping track of my relatively few makeup and bath products, I only used the "nails" section of the app. When you choose "nails," here is what appears:

This is one of the things that annoy me about the app - it's "lacquer," not "laquer." Also, "base coat," not "under laquer," and "top coat," not "over laquer." *headdesk* After you click on "laquer," this is what appears:


Rather, that's what appeared after I added all my polishes to the database, which took quite a while as I have over 260 now (I'm too lazy to go check my spreadsheet and see exactly how many I have). I can't imagine adding 1,000+ polishes to the app! One comment I have as far as how this screen shows up is that I would like for the section with the stars to be smaller so that the entire name could be displayed. Of course, I know that A Good Man-dar... is A Good Man-darin is Hard to Find and that All A-Bordeaux... is All A-Bordeaux the Sled, but it still bugs me. I wouldn't particularly mind if the stars were gone from the main screen altogether and appeared only as a part of each individual polish entry. I would also like the app better if you could choose how to sort your entries - by name or by brand.

When you click on a polish name, this is what it looks like:


I like that they have sections for the purchase date and for any notes about the polish. As I use polishes, I will probably go through and add notes about application or dupes in the "notes" section, which I imagine will be very useful when I'm out shopping. As you can see, there is an arrow at the bottom right of the screen. When you click on it, this is the screen that comes up:


I can't think of the circumstance under which I would need to send an entry in the app via email, but if I need to at least I know I can!

Overall, I honestly do not think this app is worth paying $1.99 for, and I wouldn't buy the app myself. Then again, I'm very stingy about paying for apps, and you may feel differently. However, a huge drawback that I see is that there is no free (and limited) version that you can try before buying the full version, like there is with many apps. If you think you'd like it and don't mind spending the money, sure - go ahead and get the app. But if you have your doubts, I would advise against buying.

I received this product from the company to review; however, this will never affect what I say about a product. See my disclosure policy for details.