Saturday, July 31, 2010

OPI Absolutely Alice

I got my new camera charger in the mail today! This means that my pictures will now be much larger and better quality; however, this also means that you will be seeing my ragged cuticles in even greater detail. Hello there, cuticle cream, haven't seen you in awhile!

 inside, artificial light
outside, shade

The sun decided not to come out today, so no sunlight pictures. Sorry, the weather was just not doing what I asked. :) However, I do love Absolutely Alice! This is three coats without top coat, and it is completely opaque! I am very pleased at how much glitter was packed into the clear base, and I love the color. Another thing I love is how smooth it was without top coat - it looks pretty bumpy in macro, but it is only slightly rough. While I don't look forward to taking this off, as I'm pretty sure it will be a cotton pad massacre, I can't wait to try Mad as a Hatter!

P.S. Do any of you know how I can make my pictures "clickable" - that is, how can I put them in a smaller size in my post so that when you click them, they open full-size in a new window?

Blogs of the Week

After seeing similar posts on other blogs, I thought I'd start a weekly segment where I link to new and new-to-me nail polish blogs. I will try to do this every Saturday; if you want to be linked just leave a comment!


Friday, July 30, 2010

OPI My Private Jet

Today is turning out to be such an amazing day...not only have I passed 50 followers (THANK YOU THANK YOU THANK YOU to infinity and beyond, etc., and so forth!), but OPI Mad as a Hatter and Absolutely Alice arrived in the mail! These two polishes were my biggest lemmings until I ordered them from an etailer via Amazon, and then I just had to wait for them to arrive at my house, which they now have, and I love them:


SO PRETTY! These pictures do not do them justice at all. *weeps tears of joy* Okay, maybe that's a bit much, but I am so glad to finally have these in my possession, and I can't wait to wear them!

Today I decided to try OPI My Private Jet, which I purchased at Ulta yesterday. While it's not the old, more holo-y color, I'm completely okay with that. The new My Private Jet (at least my bottle) is charcoal grey with a bronze flash and holo glitter, and I am in love with it. My Private Jet is what I wanted from the Charlotte Russe charcoal holo, and yet it is so much more. Enough of my blathering, take a look:

inside, with flash
inside, with flash
outside, in shade
outside, in sun
outside, in sun

All of these pictures are surprisingly accurate. When out of direct light, My Private Jet looks like a charcoal grey with flecks of silver and an occasional flash of bronze. Under a lightbulb or in the sun, though, it becomes absolutely brilliant. None of the pictures really show the polish to be as holographic as it actually is, and they also make it seem like it's straight charcoal on the nail. The bronze that is visible in the bottle shots is actually very visible in real life as well, both in and out of sunlight.

My Private Jet also had very good coverage. Surprisingly, I could have gotten away with one coat, but I added a second to maximize the holo impact. I really, really love My Private Jet, and while I can't wait to try Mad as a Hatter and Absolutely Alice, I will still be a little sorry to take this off.

Thursday, July 29, 2010

So this is what happens...

...when I go to Ulta.


I was out of town today for an appointment with my optometrist, and while I was in the area I thought I'd go to an Ulta because there isn't one where I live. Of course, I picked up nearly every polish in sight, but I managed to narrow it down to seven: Orly Enchanted Forest, Orly Happily Ever After, Orly Retro Red, Orly Old School Orange, Sula Paint and Peel Moss, OPI My Private Jet, and Piggy Polish Just Before Dawn. I was absolutely thrilled to see that Ulta had an Orly Plastix display, because for some reason my nearest Sally's doesn't have them. Unfortunately, all the Viridian Vinyl and Purple Pleather polishes were gone...I guess I wasn't the only one who liked them best. Anyway, you can look forward (or not) to seeing these soon!

Hana Professional 1" Ceramic Tourmaline Flat Iron

I am not the sort of person who would spend $200 on a flat iron - I just don't rate straight hair that highly on my list of priorities. However, when I won a Hana Professional 1” flat iron from a Body & Soul giveaway, I was eager to try it out and see how superior it was to my old, worn-out flat iron from Walmart.

Yesterday, when my Hana arrived, I had fortunately not done anything to my hair besides wash and towel-dry it. Naturally, I immediately unboxed it and straightened my hair with the help of Hana Shine Shield Thermal Protectant (which apparently costs $50 for 2 fl. oz. … yikes!). I was flabbergasted. Not only did it straighten my wavy hair in one pass, the Shine Shield left my hair shiny, soft, and smelling wonderful. Unfortunately, I neglected to take before pictures, but here is what my hair looked like (EDIT: before and) afterwards:


Wow! My hair was much straighter and shinier than it looks in this picture. This was accomplished in much less time than it normally takes to straighten my whole head of (fairly abundant) hair, and the results were much, much better! I still can't say that I'd pay $200 for a flat iron, even if it turned my hair into strands of 24 karat gold (well, maybe then – at that point it'd pay for itself), but this baby is magnificent! Even better, it came not only with the Shine Shield, but with a case, a silicone mat to use at home, and a heatproof travel pouch. I feel so lucky to have received this, and would definitely recommend it for anyone who is willing to shell out that much for a straightener!

Nina Ultra Pro Grin and Berry It

Grin and Berry It is from Nina Ultra Pro's Pearly Brights collection. All the polishes in the collection are neon shimmers, which really intrigued me - I wondered if the polish would still have a neon finish or if it would be one of those “neons” that's not really a neon. Fortunately, Grin and Berry It lived up to my expectations and had excellent coverage for a neon! This is three coats with NO white base:

 indoors, artificial light
 outdoors, shade
outdoors, sun

Agh, what a pain to photograph. Purples are hard to photograph. Neons are hard to photograph. So guess what you get when you try to photograph a purple neon? Yeah. The indoors picture is too red, while both the outdoor pictures make Grin and Berry It appear way paler and less neon than it is in real life.

But if only you can see it in real life...it's so gorgeous! You can see a few brushstrokes when the polish is wet, but it dries to a satin, brushstroke-less finish. The base color is absolutely electric, and the blue shimmer adds an unexpected duochrome flash. Duochrome neons? Sign me up! I didn't even have to use a white base with this, and still got amazing coverage and color. Grin and Berry It is the only polish I bought from the Pearly Brights collection, but I think I'm going to get some more if they're still there when I next visit Sally's.

Note: I have read that the Pearly Brights collection is similar to Color Club Electro Candy, but I don't have any Color Club polishes so I can't compare.

Wednesday, July 28, 2010

I Vant to Suck Your Blahhhd!

I chipped my French manicured thumb while washing the dishes, so I decided to take the opportunity to do my entry for Polish Hoarder Disorder's vampire challenge. Before I go any further, I should probably say that I don't like Twilight. At all. However, I have read and do like Dracula, so I was excited about this challenge anyway. After doing a few different designs on fake nails glued to toothpicks (I used the giant thumbnail ones that are way too big for me - they're great for practicing), I came up with this:


Mm...blood. For the base color I used an unnamed Charlotte Russe taupe/greige color, and for the bloody streaks I used Borghese Sonata Berry, which was the closest thing I had to the color of dried blood. Charming, I know. :) I did the design with my usual tool of a toothpick. I was pretty happy with this rather gory mani - while I'm probably not going to wear it around my small town at this juncture, I'll be bringing it back out around, say, late October.

Are you planning in participating in this PHD challenge? (Because you should.) Thanks for reading!

Zoya Ivanka

Today's NOTD is waiting to be posted as a guest blog on Inga's blog, The Original Swedish Blonde (who you should go read now), and I'm going to be spending the rest of my nail efforts for the day trying to work out what to do for Polish Hoarder Disorder's weekly challenge. Thus, today you get a swatch from sometime last week - I hope you don't mind too much! I used two coats and no top coat in these pictures.

indoors, artificial light
outdoors, shade
outdoors, sun

The colors in these pictures are actually very accurate, although my skin is definitely not as yellow as it looks in that first picture - if I started turning that color, I think I would visit the doctor. :) However, my pictures fail to capture the amazing depth, beauty and sparkle of Ivanka. I definitely think this is a must-have for any green lover or, in fact, just about anybody. 

Tuesday, July 27, 2010

L.A. Colors Antique Rose

I went shopping for some L.A. Colors polishes for my friend's birthday the other day, and of course I had to get some for myself! I ended up buying an extra bottle of Vintage Rose, which I tried today.

indoors, artificial light
outdoors, sunlight
outdoors, shade
The two outdoor pictures are very accurate, and the indoor picture is rather too orangey. I really like this color - it's grandma-friendly, but I don't think it's a "grandma" color. It looks more taupe than rose in most lights, though it is certainly a pinky taupe, and there is a very subtle gold shimmer that is not easy to see, but is definitely there. The color is fairly opaque - I used three medium coats. While it's light enough to be worn in spring and summer, it will be one polish that I will be pulling out more often in fall. I don't have China Glaze Ingrid yet (come ON, Sally Beauty Supply, stock Vintage Vixen!!), but I imagine Vintage Rose as being a light, pinky second cousin of Ingrid. Definitely a pretty color, and one I'm glad to have bought - and Kayla, if you're reading this, I hope you like it too! :)

Monday, July 26, 2010

Revlon Runway Collection Mystic Nails

Before I get to the nails, I made a spreadsheet yesterday that lists all the nail polishes I own and some information about them. If you're interested, check it out - and if there's a specific polish you'd like to see here, let me know through email or in the comments.

Today, I decided to try fake nails for the first time since a youth theatre play in which I played a wolf and, accordingly, wore bronze fake nails (which were intended to be worn for one day) for my "claws." I used the Revlon nails I received in my Revlon/Nailene package the other day and applied them using the nail glue that came in the package. It quickly became evident to me that there was a certain learning curve to the process - I managed to get nail glue on my fingers as well as my nails, and there are bubbles in the glue under most of my nails. However, I think the end result looks quite nice:


My nails have never grown this long, so it's quite nice to see what my hands look like with nails of a greater length. I really like the design, though I do wonder about one claim made on the label - "compares to $50 salon style." Really? I've never had a salon manicure, so I have absolutely no idea how much they typically cost, but $50 seems like a lot to me. If you could enlighten me, I'd really appreciate it.

All in all, I like this product - while I had some difficulty, I thought the nails were fairly easy to apply. While I definitely wouldn't want to wear these all the time (I would get bored), I will keep them back for special occasions or when I feel like having fancy nails without the work of painting them myself.

*This product was provided to me by the manufacturer for review. However, this has not influenced and will never influence my review(s) - I will always say what I truly think about a product.

Revlon Fantasy Length Defining False Lashes

This was my second adventure into the land of false eyelashes...and it was not successful. These lashes are not glue-on, like yesterday's - rather, they have little strips of adhesive at the base of the lashes. For me, this made it way harder to apply them straight. Additionally, I found that the adhesive (which is black) made it look like I was wearing poorly-applied liquid eyeliner. Not an attractive look. These would probably look better if I applied lots of eyeliner prior to sticking them on, but I just don't want to do that. They would also probably look better if I was better at applying them, but I'm not. Since I posted pictures of myself without falsies yesterday, I will just give you an "after" picture today:


Sorry for the crappy picture. I will probably try these again sometime, but maybe not...I am tempted to just throw them away.

*This product was provided to me by the manufacturer for review. However, this has not influenced and will never influence my review(s) - I will always say what I truly think about a product.

Sunday, July 25, 2010

Rimmel Rapid Ruby + Nailene Bedazzle Stickers

Rapid Ruby is an old, OLD polish from Rimmel's 60 Second polishes. I've had it for nearly ten years, so I did have to add several drops of nail polish thinner, and I think I may add a bit more. I added crown stickers from my Nailene Bedazzle* pack to my thumbnails and rhinestones from the same pack to my ring fingers, and I'm loving the combination! In these pictures I'm wearing base coat, two coats of Rapid Ruby, the stickers and rhinestones, and top coat.

my left hand, shade
my left hand, sun
my right hand, shade
my right hand, sun

All these pictures are pretty color-accurate. While Rapid Ruby doesn't look quite that bright in sunlight, it's close, and the pictures taken in shade are nearly spot-on. I love the combination of a classic red and a bit of royal bling - I may start asking people to address me as Your Highness (but not really). :)
The stickers were very easy to apply. I placed the stickers with the end of a toothpick and pressed them down with my fingers. I think I got them fairly well placed, though the one on my right thumb is slightly wonky. The stickers look really perfect - I can't see the edges of the stickers, there aren't any bubbles, and it looks like I actually painted the designs on my nails (excepting the fact that my designs wouldn't be that neat). The rhinestones are fairly bumpy, but they and the stickers have lasted through my morning hair-washing, so I'm pretty confident that they will last. I can't wait to use some of my other nail stickers! Here's what's in the rest of the pack:

clockwise from top left: rhinestones; butterflies and stars; flowers and butterflies; crowns, stars and royal-looking designs

*This product was provided to me by the manufacturer for review. However, this has not influenced and will never influence my review(s) - I will always say what I truly think about a product.

Revlon Fantasy Lengths Intensifying Glue On Eyelashes

Whew! What a long title. :) I'd never tried false eyelashes before, so I decided to try these first because they had a sticker on the box that said they were the "Temptalia Editor's Choice Winner: Best False Eyelashes 2009" - also, they seemed to be a reasonable length and thickness. I thought applying stick-on eyelashes was going to be incredibly difficult, but, surprisingly, it was not. I consulted the directions on the box and a very helpful WikiHow article, and found the process to be pretty easy. I took pictures throughout the process:

my eye without mascara, eyeliner, or falsies
my eye with mascara
my eye without mascara, with falsies
 my eye with mascara and falsies  
my eyes with mascara, eyeliner, eyeshadow and falsies

Sorry for the poor-quality pictures - I obviously am not used to taking pictures of my own eyes. In my one-eye pictures where I'm wearing the falsies, you can see that they are lifting up a bit on the end. I think I must have missed some glue on that edge. I noticed this before I took the last picture and fixed it, but was too lazy to take even more pictures. I was pleasantly surprised with these glue-on eyelashes. I thought they might make me look like a freak since my eyelashes are already really long (though you can't tell in my pictures), but they just made my eyes look even bigger in a flattering way. While I wouldn't use these every day, I would definitely use and recommend them for special occasions.

*This product was provided to me by the manufacturer for review. However, this has not influenced and will never influence my review(s) - I will always say what I truly think about a product.

Saturday, July 24, 2010

Nail Mail!

Recently I received an email from Melissa Sakamoto from the marketing department at Pacific World Corporation, which owns the Nailene and Revlon companies. Ms. Sakamoto offered to send me nail and false eyelash products from Revlon and Nailene for me to review, and I accepted. The package came in the mail today just as I was leaving for a movie, so I didn't get to open it until I got back...at which point I pretty much tore the box apart in excitement. ;) Here's what I got:

The Revlon products: Revlon Runway Collection Medium Length nails, Revlon Intensifying Fantasy Lengths eyelashes, Revlon Defining Fantasy Lengths eyelashes, Revlon Long Volumizing Beyond Natural eyelashes, Revlon Precision Adhesive nail glue:


The Nailene products: Nailene Couture Runway Designs nails, Nailene So Natural nails, Nailene French Manicure with tip guides and polishes, Nailene Bedazzle Nail Art Super Star stickers, Nailene miscellaneous fourth-of-July themed nail stickers, Nailene Perfect Tips & Toes French Polish Guides:


I am super excited to try all of these! Fake eyelashes and fake nails are not really products that I buy - I feel like fake nails are, well, fake and I already have astronomically long eyelashes - so it'll be interesting to see how I like them. I already use and love Nailene's French tip guides (they're what I used for my matte tips with Orly Luxe) and I was about to run out, so I'm happy to have more of those, and I can't wait to go sticker-crazy! :)

Orly Luxe

Luxe is another polish from the Orly Foil FX 2010 collection consisting of Rage, Luxe, and Shine (I won't be showing Shine, because my local Sally Beauty Supply didn't have it for some reason). Luxe is an incredibly shiny, cool-toned gold with bits of silver shimmer running through it. While the silver isn't as evident as in Rage, it is still obviously there.

Instead of wearing Luxe on its own and then with a matte top coat, I did matte French tips using Essie Matte About You.
indoors, artificial light
outdoors, shade
outdoors, sunlight
I love Luxe! It's glitzy and shiny and gorgeous, and while it doesn't complement my skin tone as well as most of my other golds, I still love wearing it, and I can't stop staring at my nails. My pictures are actually fairly color accurate for once, and the picture taken in sunlight is spot-on. The matte tips are slightly more evident in real life, but they are subtle.

The next couple weeks are going to be pretty exciting - I've got several nail polish and nail-related packages coming in the mail fairly soon, so be prepared! :)

Friday, July 23, 2010

Orly Rage

Sorry my post was so late today - while I had my camera, I was away from my computer all day. On to the polish!

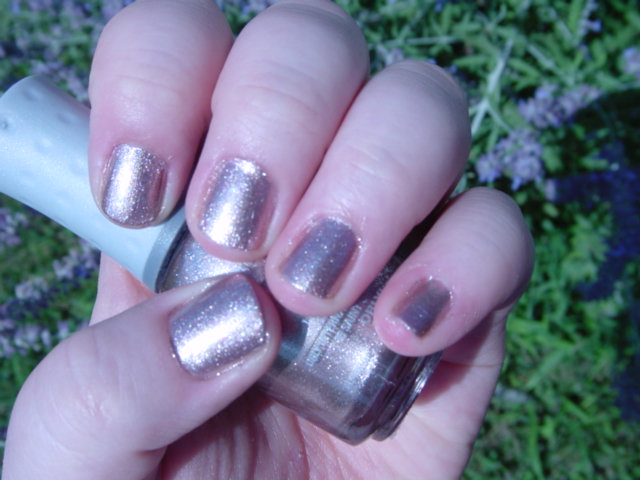
Orly Rage is one of the three colors from Orly's Foil FX Spring 2010 collection (the other two are Shine and Luxe). The collection was pitched as giving nails a Minx-like finish without the high price, and in my opinion they certainly deliver! Rage was very, very, VERY shiny - I can't quite see myself in my nails, but it's definitely more reflective than most polishes. Rage is a rose gold with bits of silver in it, and while I absolutely love the color, I think it would look better on darker skin - darn pinky-pale skin tone! Here's Rage without top coat:

indoors, artificial light - way too gold; it's rosier in real life
 outdoors, sunlight - look at that shine!
 outside in half sun, half shade
 outside in shade

I took a ton of pictures, and in none of them did I manage to capture the beauty that is Rage (though I did capture my somewhat messy cleanup and horrible cuticles - sorry about that). Think indoor pic color, but rosy instead of straight gold. There are silver, rosy, and gold particles in the polish, so that may be what contributed to this polish being impossible (for me) to photograph properly. At any rate, Vampy Varnish has a way better, more-accurate photograph that you can check out if you like.

I loved Rage, but I wanted to try it with a matte top coat to see what would happen. I used Essie Matte About You, and here are the results:

indoors, artificial light
outdoors, sun
outdoors, shade

Beautiful! For some reason, I actually prefer Rage with a matte finish. I think taking away the shine makes the polish look less silvery (though it still does in my photos). The matte top coat also allows you to see the disparate rose, gold, and silver particles, which I love - it gives the polish a new depth. I wish I could stop it from looking either silver or gold in my photos, but alas...I suppose I'll just blame it on a combination of my dinosaur camera and bad lighting.

On a somewhat related note...who else can't wait for the Orly Foil FX Fall 2010 collection coming out in September? They are going to be actual color-colors (i.e. not just silver and gold), and at the moment it's looking like I'll be buying them all!

Thursday, July 22, 2010

My Stash

I worked hard enough on my nails yesterday (and liked them well enough) that I didn't want to take them off quite yet, and unfortunately I don't have any old pictures left. But while you won't be seeing my nails today, you will be seeing some polish - I decided to finally count the number of nail polishes that I have. Here are my boxes, which, as you can see, I organize by color:

 base/top coats, treatments, reds, oranges, yellows, greens, teals
 blues, purples, pinks
 whites, blacks, pearlescents, silvers, golds, bronzes, browns, greys, taupes
 untried polishes

And the total comes to...90! I'm sure it'll be 100 by the time I am actually able to get my hands on the fall collections - I am SO annoyed that China Glaze Vintage Vixen won't be available at Sally Beauty Supply until September. Anyway, I know my mom thinks that's way too many, but I just like to remind her that I actually don't have that many bottles of nail polish compared to a lot of bloggers...I don't think she believes me though. :)

What do you think - is 90 bottles of nail polish more than any normal person would ever need, or is it a drop in the ocean? About how much nail polish do you have?