Showing posts with label nail art. Show all posts

Thursday, January 9, 2014

January Nail Art Challenge Day 2: Pattern


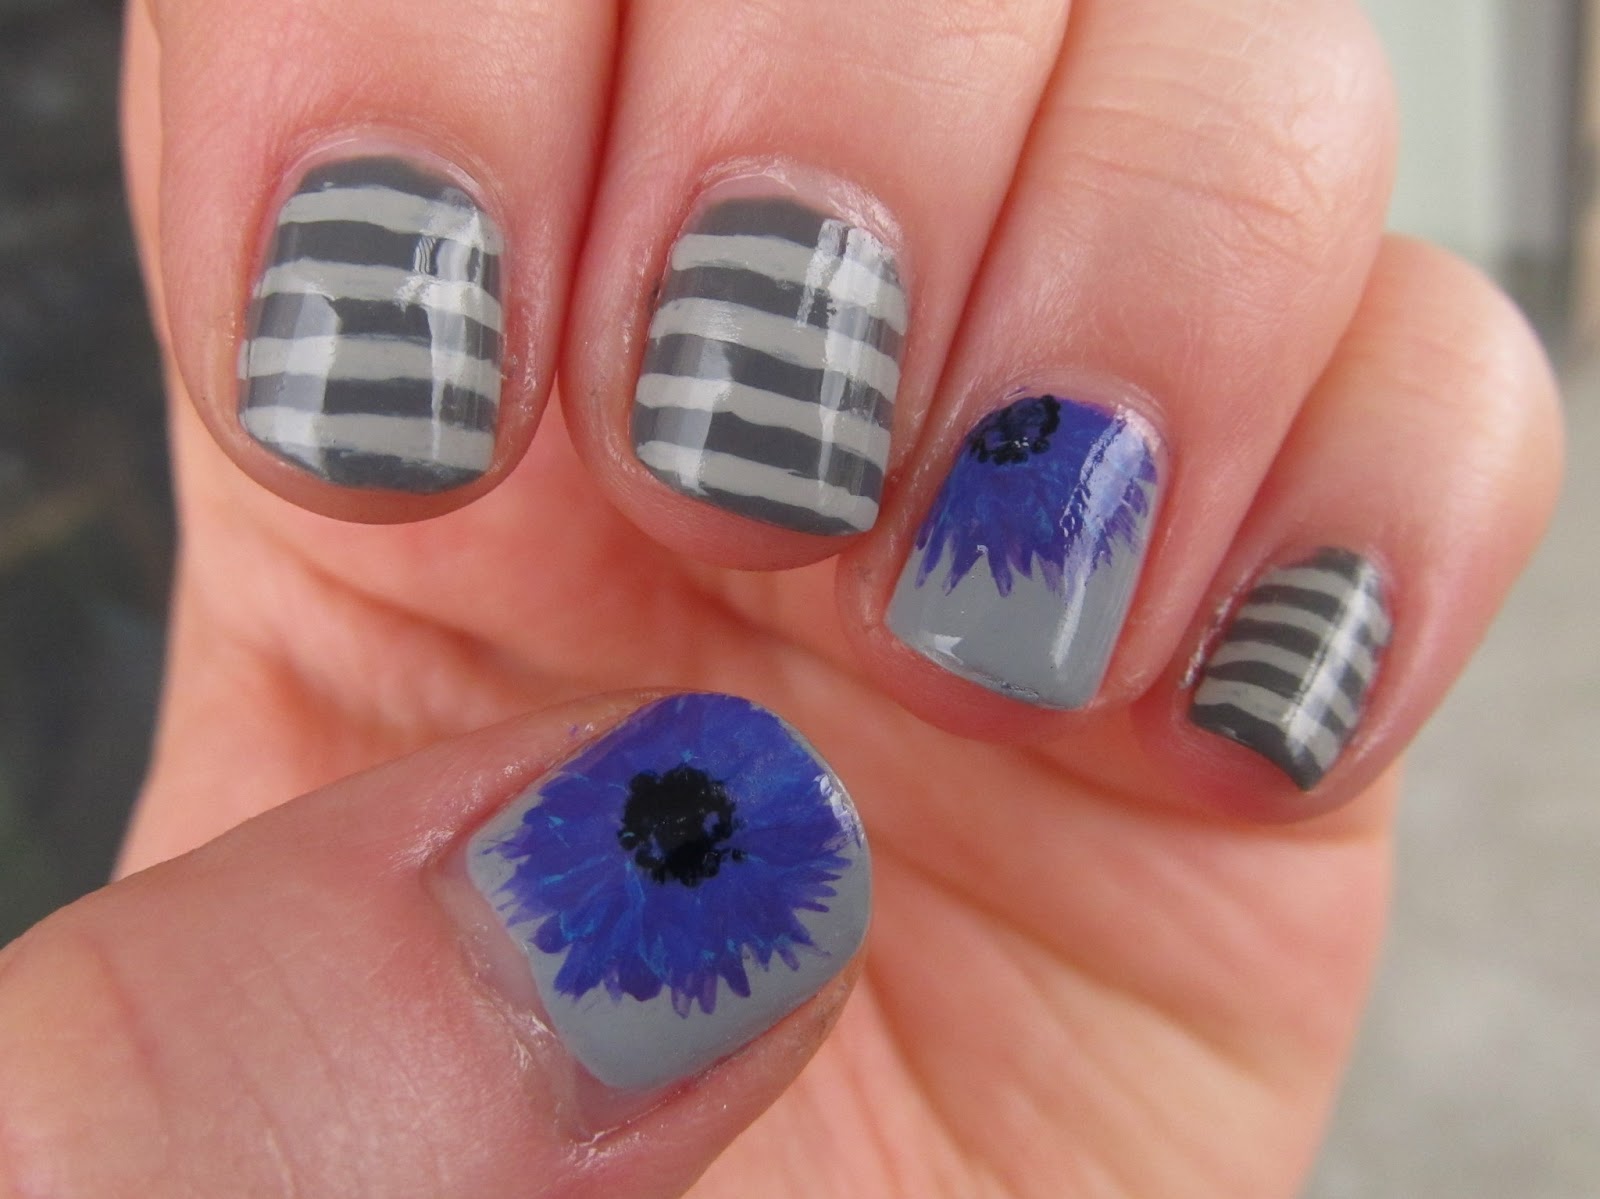
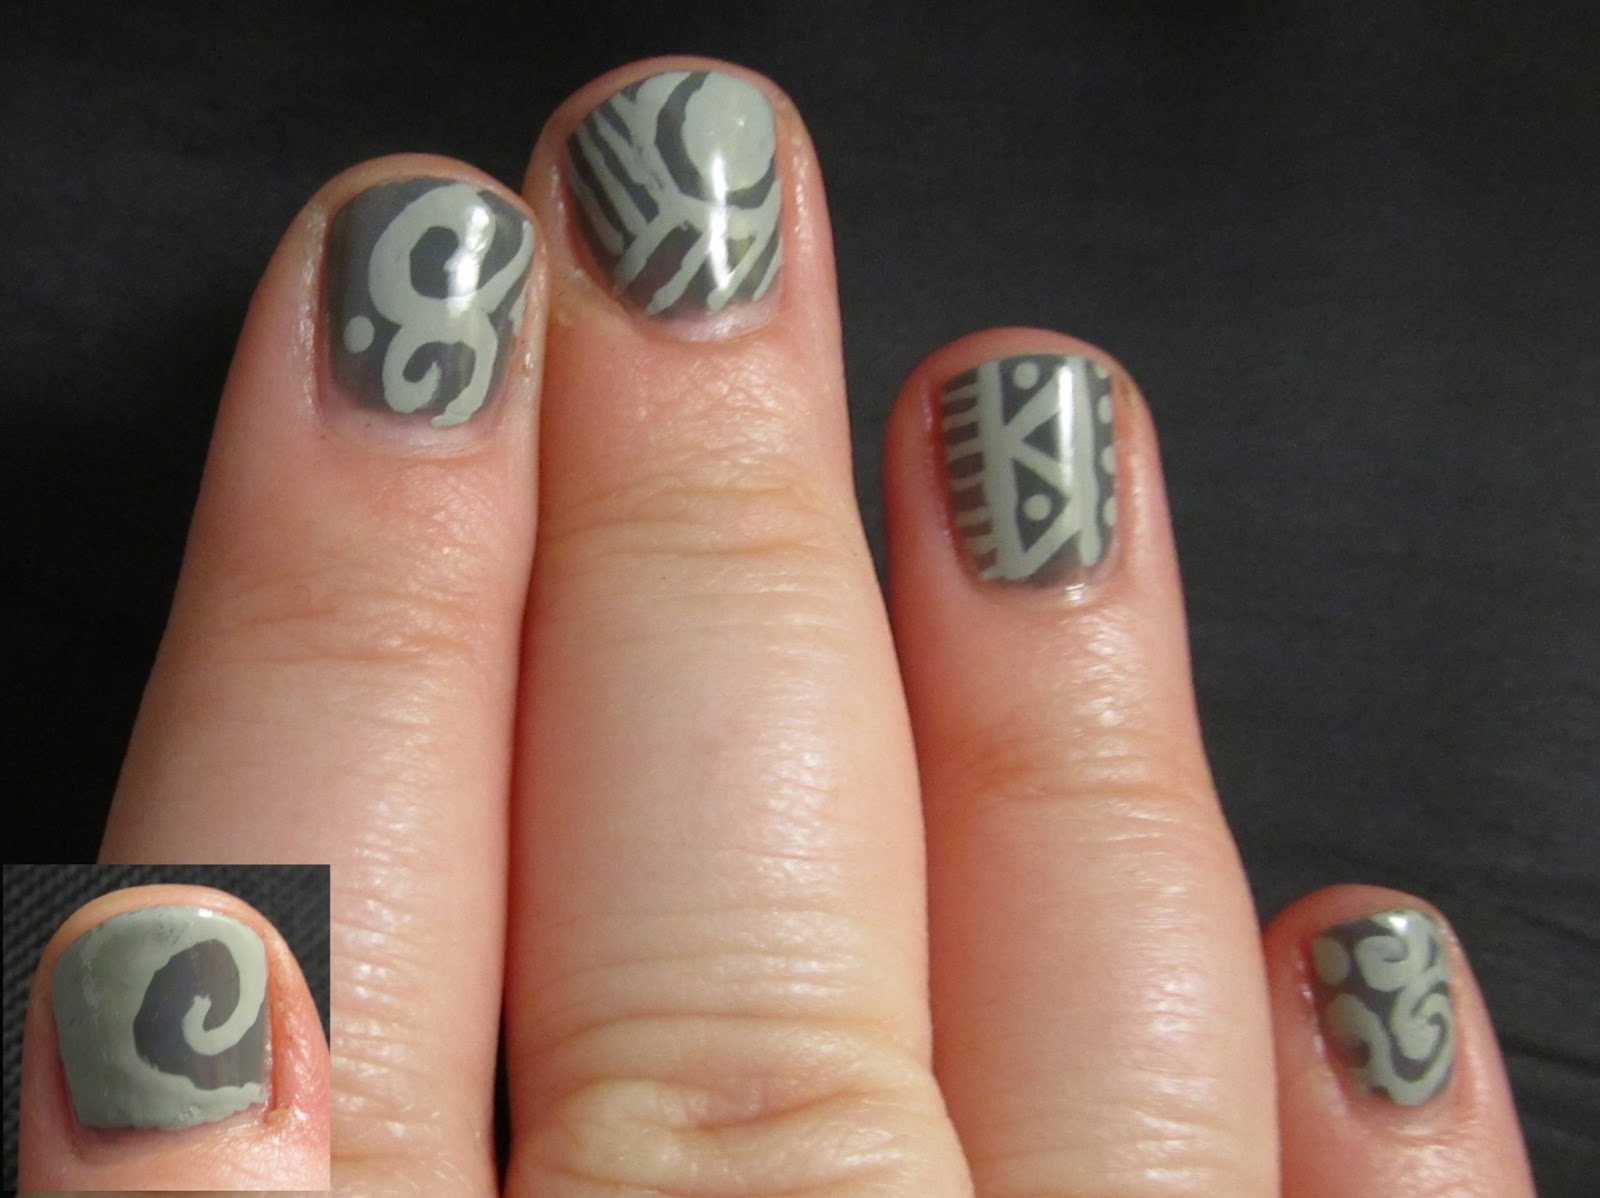
Hello! I'm back just barely in time for the second day of the January nail art challenge. The prompt for today was to do a pattern, and I decided to do dots. My base polish is Butter London Royal Navy (a one-coater!), and I used acrylic paint for the dots. I intended them all to come out looking like the thumbnail does, but obviously didn't quite get there. I'm still rather fond of them, though.


Apologies for the messy edges - I haven't been able to find my cleanup brush, and it's definitely noticeable with such a dark color. 

On another note, if you've gotten to the end of the post, could you do me a favor and compare the challenge image at the top of this post with the one in my previous post? For some reason this one appears darker even though it's the same exact image I used last time. 

Thursday, December 5, 2013

Christmas Skittles!

Good morning, and happy Thursday! Today I have some Christmas nails to show you. I am super excited for Christmas this year - partly because I'm actually excited for Christmas, and a little bit because I just want to be done with the semester. It's wrapping up! I only have one final, two projects and two papers left, and I'll be done it a week. So excited. Anyway, here's my Christmas nail art skittles mani:


Thumb & ring finger: Pure Ice Kiss Me Here with two coats of Lac Attack Holidays in Hogsmeade
Index finger: Two coats of China Glaze White Cap, topped with two coats of China Glaze Snow Globe, topped with two-ish (I say this because there was some finagling involved to get enough glitter on) coats of OPI Lights of Emerald City. (Not looking forward to removing this.)
Middle finger: Orly Meet Me Under the Mistletoe with gold circles in Zoya Ziv.
Pinkie finger: Zoya Rekha with snow in Cult Nails Tempest

Whew! That was a long list of polishes. I started this mani not knowing exactly what I wanted to do, but I really like how it turned out. This was the first time I tried Lac Attack Holidays in Hogsmeade, despite having bought it almost a year ago - I just felt weird about wearing it in January. I really like it, though, especially the stripey large red hex glitters. So cute.

It's supposed to snow here in St. Louis today, tomorrow, and Sunday. I really hope we get some accumulation, and I might just have to do another wintry/Christmas mani to get in the mood. :) Have a great day!

Thursday, September 5, 2013

Red Nail Art

EDIT 09/16/13: Obviously I expect too much of myself, as I haven't had time to do another nail art mani since I posted this originally. I am still going to try to post more nail art and I will probably use the challenge as inspiration; however, I am a college student with unrealistic expectations of what I can do with my time, so...yeah.

Hello all! I decided to do the 31 day challenge again this year, as I did two years ago in November. This time I'm not going to be able to do a post every day, and you'll notice it is no longer the 1st of the month (oops), but I really enjoyed it before and thought it'd be a good way to get my mojo going again. For those of you who haven't seen it before, here's the challenge:


The first day of the challenge is red, so I decided to wear one of my top two favorite juicy reds, Sally Hansen Complete Salon Manicure All Fired Up. It's a squishy, super-bright red that really pops, and I always feel a little more put together when I wear it. After sporting All Fired Up by itself for a day, I decided to add some stripes. I used acrylic paint because I think it's easier to work with, but of course you could use polish as well.


Isn't it a great combination? I've been seeing a lot of the first two fingers as accent nails lately, so I thought I'd try it out. I originally intended the pink to stand out a little bit more, but I think maybe I like it as it is after all - it provides a little balance against the screamingly bright orange, purple and red. Sadly, as I'm typing this my nails have already chipped. C'est la vie, non? *sigh* Anyway, I won't be posting the rest of the weekend because I'm taking a short trip home to go fishing, but I look forward to painting my nails and posting again as soon as I get back! Have a great weekend!

Wednesday, August 21, 2013

Green & Gold Sponging

Hello again! As you're reading this, I'm about to move back into my apartment for the fall semester. I'm writing this on August 11, so hopefully I will have packed by the time this is published, but you never know...I am a pretty good (bad?) procrastinator, particularly when it comes to things like packing, which you just have to undo again later. The nail art I'm blogging about today is a little something I did back in late July. I used Zoya Neely as a base, Zoya Josie, Sally Hansen Green with Envy, and another green (the darkest bits) that is escaping my memory right now for the green sponging, and added a little bit of China Glaze Blonde Bombshell for some sparkle. On a side note, Blonde Bombshell is pretty much the best gold glitter ever, and you should get it now. But anyway, back to the sponging ---


I was very happy with how this turned out. The green sponging is subtle, but pretty, and the gold glitter adds an extra bit of oomph that makes the whole thing pull together. I thought after completing the manicure that it was more of a spring-y sort of nail art, but, ehh, who cares? I say wear whatever you want all year round, whether it's your clothes or you nail polish. Though I do tend to be a bit more versatile with polish, since it's not affected by the whole weather thing. ;)

P.S. The background for my pictures is a page of Mental Floss magazine, which is my favorite magazine ever in the entire world ever. I was reading it at work on lunch break, which is when I took these pictures.

Friday, June 7, 2013

A Different Kind of Galaxy

Hi there! I've done several galaxy manicures of this variety in the past, but after wearing Living Water by itself for a day or two, I thought I'd try a different kind of galaxy manicure. I sponged Sinful Colors Nail Junkie and Sally Hansen Laser, then topped it off with a coat of Claire's Starstruck. I did have to place the star glitter from Starstruck, but other than that it was quite an easy manicure, and I enjoyed wearing it for the day.


Sorry for the green glow on my nails in some of the pictures...the top coat was apparently so shiny that I reflected the trees and grass in almost every picture. Other than that, the pictures are pretty accurate.
In other news, I might not be posting a lot for a while...my fingers recently started peeling profusely for no particular reason I can discern. This occurs despite the heavy moisturizing I've been doing over the past couple of days, and it doesn't really make for nail pictures that are pleasant to look at. So, until whatever it is quits or is abated, I won't be taking any new pictures. I do have one manicure left in my archives, but that's it, so...yeah. Hopefully my fingers will be back to normal soon?

Tuesday, May 28, 2013

Spring Flowers & Stripes

Hello again! I hope all of you who live in the U.S. had a nice, long weekend and a good Memorial Day - and of course, I hope everyone else had a good weekend too. :) The manicure I'm posting today is actually the last one I did before moving out of my university apartment and going home for the summer. Since I didn't have much time to do anything but study and revise papers during finals, I thought I'd take a short break to do some nail art, and this was the result.

Monday, May 6, 2013

Red Gradient

Hey there! Today's my first post as a 20-year-old, and I decided that my birthday present to myself was going to be no homework or studying (except for the final edit of my paper this morning), so I've been watching Whose Line is it Anyway and painting my nails all day. :) The manicure I took off today was the one I'm showing you now - I made a red sponged gradient using Borghese Sonata Berry, Rimmel Rapid Red, and OPI Red My Fortune Cookie. I wasn't sure how well it would turn out, but I really liked the results.


I always forget how much I like dark red polish until I put it on...it somehow has the effect of immediately making me feel classier. Borghese Sonata Berry is the perfect dark red because it's dark, but not so dark that it looks black. With the other two reds added, I think it makes the perfect gradient! 

Thursday, February 7, 2013

Grey-on-Grey Nail Art

Hello hello! I have good news, bad news, and more good news. Good news: it's almost Friday. Bad news: it's not Friday. Good news: I have some awesome nail art for you today! I started out wanting to do something like a henna pattern on my nails, but it ended up being some weird-but-cool combination of flowers, dots, and whatever random patterns I could come up with Monday night/Tuesday morning at 12:30 AM...yeah, that happened. Fortunately, all went well and I was very happy with the way this turned out! Of course, it doesn't look as good in macro because you can see all the little mistakes and imperfections, but hopefully you get the idea.

left hand
right hand
You even get to see my right hand! I'm not sure "get to" is the right phrase, though, as my right hand is a bit gross compared to my left hand since I'm (case in point: writing callus on my middle finger). For the dark grey, I used Pure Ice Kiss Me Here, and the light grey is acrylic paint. I think it's probably a good thing I did grey-on-grey, because I think if I had used multiple colors it just would've looked nuts! As it is, though, I'm quite happy with how it turned out.

Monday, December 24, 2012

White Christmas

Hello again! Thanks bunches to those of you who have stuck around during my semester-long hiatus - I really appreciate it. Today I have some Christmas nails that, while I like them, aren't quite up to par in my opinion, at least on one of the nails. In my defense, I packed in a huge hurry because I had to pack and move out pretty much right after finishing my last two finals, and therefore forgot important nail art implements like...well...all of my nail art implements. Except toothpicks - I have toothpicks. So, this is a toothpick friendly manicure. What do you think?


Tuesday, August 21, 2012

Interrobang?!

Hello there! My most recent manicure was inspired by this nail wheel featured on the one of the many nail art tumblrs out there, which are probably my biggest sources for inspiration when I'm not sure what I want to do with my nails. I liked the neon yellow nail with the black arrow on it, and I started thinking about doing a manicure with arrows and symbols. Then I saw an interrobang tattoo on Contrariwise, and I knew I had to incorporate that somehow, so it turned into a punctuation/symbol mani. The interrobang (‽) is a non-standard punctuation mark that combines an exclamation point and a question mark, and, language nerd that I am, I've always had a bit of a soft spot for quirky punctuation marks. Here's the finished result (I used Icing Grande Margarita over Wet 'n' Wild White Creme, and the black is acrylic paint):

outdoors, sunlight

I was really happy with the way all of the nails turned out, and though the interrobang is definitely my favorite, that comma is pretty dang cute, too. I have to say, this has definitely rekindled my desire to do a newspaper mani...I'm curious to see what it would look like if you did it multiple times between layers of a really clear jelly or a top coat. Perhaps that will happen soon? 

P.S. I'm moving back to university Friday, so wish me luck! I have yet to start packing (whoops), so I'll need it. I'm super excited because my roommate from last year and I have an on-campus apartment, which means I can cook, which means yummy food. Yay. :)

Sunday, July 22, 2012

Blue on Blue Ruffles

Apparently I haven't posted for nearly a month. Well . . . that went quickly. In the meantime, I started my first full-time job, continued my online history class, and watched this blog enter the Terrible Twos. To me, it seems like the two-year mark is a particularly significant one for nail bloggers. Maybe it signifies that since you've had enough stick-to-it-iveness (yes, I just made that word up) to last two years, you know what you're doing (ha! As if. I always feel like I still have something to learn). Anyway, for my first post as a two-year-old - or, well, you know what I mean - I have some ruffly tips to show you all. I did this Friday night, and they came from the fact that I wanted to do some nail art, but I didn't have a lot of time to do it. Hence, Sally Hansen Insta-Dri Blue By got topped with lighter blue acrylic paint.

 outdoors, sunlight

I was really happy with the results. While they don't all look exactly the same, I actually kind of like the differences. If I'd had the time, I would've probably done alternating ruffles with these two colors, but perhaps that's for another time. And with that, I go back to my history book. What have you been doing with your summer?

Thursday, June 14, 2012

Ruffles Mani

Hello there! Today I have a ruffles mani to show you, a technique I learned from Chalkboard Nails. Of course I had to try it right away, so I went through my Melmer drawers and ended up pulling out American Apparel Peacock, OPI Dim Sum Plum, OPI A Good Man-darin Is Hard to Find, Nina Ultra Pro Salsa, Ulta Sun-sational, Zoya Robyn, Essie Exotic Liras, and Sally Hansen Green With Envy. I used the largest dotting tool I own.

 indoors, artificial light
indoors, artificial light

As you can see, I was starting to get some tipwear by the point I took these pictures, and as you can also see, the tips of my nails were getting a bit thick from all the polish. I think I should be able to get it a little thinner with more practice and control, though, and I'll definitely be trying this again - in fact, I'm wearing Icing Grande Margarita right now, and I think I might try a ruffles mani on top of that. One note I should make is that because I took these under artificial light (I suspected they wouldn't last until the sun came out again, and I was right), the colors don't appear as bright as they did in real life. If only I had a tiny personal sun that I could summon whenever I needed to take polish pics...

Saturday, June 9, 2012

Giraffe Nail Art

Hello again! Today I have some giraffe print nail art that I did recently. I've done variations of zebra and leopard patterns before, but I'd never tried giraffes. Since the giraffe is one of my favorite animals, I thought it was high time I tried, so I pulled out Ulta Sun-sational, some brown acrylic paint, and a dotting tool. Here's the result:

 natural light

I see now that the acrylic paint wasn't quite opaque in a couple of spots, but I actually didn't notice that when I was wearing the mani. While this definitely wasn't perfect, I was pretty happy with it for a first result. I didn't follow any particular tutorial; rather, I just googled "giraffe print" to get a more solid idea of what I was looking to do. You'd think I'd know what a giraffe looks like - and I do, of course - but I've always found that even when I'm trying to recreate something I have seen many times, it helps to have it in front of me when doing nail art. If you do nail art, are you the same way? I'm curious to see if it's just me.

Saturday, April 28, 2012

Preppy Stripes & Tutorial

Hello there! Today I bring you some nail art I did Thursday night. I ordered some striping tape off of Amazon a couple weeks ago, and I hadn't gotten around to using it yet, so I decided it was time to break it out. I wanted bold colors, and ended up picking China Glaze First Mate, China Glaze Grape Pop, and OPI Red My Fortune Cookie. The overall effect reminds me a bit of a prep school uniform, hence the title.

natural light

Click "read more" to see the tutorial:

Tuesday, April 24, 2012

Zoya Wednesday Gradient

Hello there - I just posted yesterday, but here I am again! I'm enjoying the brief respite between last week, when I had a bunch of tests, and finals week, which is in two weeks (starting the day after my birthday! woohoo! </sarcasm>). In the meantime, I'm hoping to be able to do some nail art and other fun stuff when I'm not doing homework...and probably some when I should be doing homework, too, because that's how I do things. Today, I have the sponging gradient I wore on top of Zoya Wednesday. In addition to Wednesday, I used China Glaze For Audrey, Essie Mint Candy Apple, and a tiiiiny bit of Essie As Gold as it Gets.

 natural light
natural light
natural light

Sorry the coloring is a bit weird on the second image - I decided to keep it in the post anyway because it shows the flaky glitter a little better than any of the other pictures. I briefly considered adding a bit of white at the tips before topping it all of with As Gold as it Gets, but I like it perfectly well as it is. The overall effect reminds me of the sky on a bright, but partly cloudy spring or summer afternoon. This can tend to have the effect of making me want to go lie outside and take a nap instead of working, but then again, it doesn't take much to do that. :) Have a great day!

Friday, March 9, 2012

Sponging with Skylar

Good morning! I took my last midterm this morning, and I think they all went pretty well, so now I'm ready for spring break! Unfortunately, that means I have to pack first, but...I'll do that later. Today I have a manicure from early February. I did this after I wore Zoya Skylar, a gorgeous blue that I didn't want to take off when I started getting tipwear. The solution? Sponging. I used Sally Hansen Insta-Dri Bronze Ablaze, Orly Luxe, and a regular kitchen sponge that I keep specifically for nail art.

sunlight
indoors, natural light

I was really happy with this - I think it looked particularly nice because of the depth I got from using two colors that are sort of different tints of the same color. I'm not sure if that makes any sense the way I worded it, but to clarify, I think you'd get a similar effect using, say, a dark purple and a light purple over another color. Plus, the great thing about sponging is that it looks fabulous, is very easy, and can be used as a mani refresher for when you don't have time (or the heart) to redo your whole manicure. I'm also thinking that I should try using sponging as a base for some other nail art, but I'm not sure what I'll do yet...like I said, though, it's spring break now, so I'll have plenty of time to think about it!

Tuesday, March 6, 2012

Mustachioed

Hey there! Look, it's only been two days since my last post, even though it's midterm - wait, let's not talk about the fact that it's midterm week. *ahem* Moving on...during The Week That Shall Not Be Named (am I the only one who thinks midterms are worse than finals?), sometimes one needs a little something to cheer oneself up. I did this manicure a couple weeks ago, but I'm posting it now because I think it's just about time for something a little silly. And what might that be? Mustachioed nails, of course.

indoors, natural light

There - I told you it was silly. And before anyone asks, yes, I did wear this out in public, and yes, people did comment on it, and no, no one told me I was bonkers. I have to say, I did mess up the pinkie a bit, but it certainly didn't detract from the fun I had wearing it, and other than that, I think it turned out quite well. You see, facial hair is not just for the face! Um. Yeah. I just said that. It's possible that it miiight be a little past midnight while I'm writing this and maaaybe I should be studying for my international studies exam tomorrow and maaaybe I'm just a little tired and it's making me slightly nuts...so. Yup. *whistles* Au revoir! 

Tuesday, February 21, 2012

Mardi Gras Nails

Happy Mardi Gras! It's a day of indulgence, and while I haven't been indulging myself too much today, I did give my nails a special Mardi Gras manicure this past weekend. I wasn't even really planning on doing Mardi Gras nails until I thought of this and decided it was too good to resist. Who could resist having their nails dripping with gold?


indoors, artificial light

For this manicure, I used Zoya Veruschka on most of my nails, Zoya Savita on the ring fingers, and Orly Luxe for the dripping gold. Though my left pinkie nail was a bit of a mess-up, as you can see, I was really happy with the way the rest of them turned out. In fact, I actually got a "that's really cool" from a straight male, so perhaps that's one way to define manicure success. I meant to add top coat and see how it looked after some wear, but after a couple of days one whole nail peeled off before I had time to do so. I have to say, though, I was impressed with how long it stayed on! I'm really going to have to try to use drip nail art more often.

Again, have a great Mardi Gras - and let me know if you're doing a Mardi Gras manicure!

Monday, December 26, 2011

Christmas Nail Art

Hello, everyone! I'm still in a Christmas lull, so this will be a short post. This is the mani I did yesterday for Christmas - I couldn't decide which Christmas nail art to do, so I did a little of everything. I'm not going to list everything I used, because that would be a long and boring list, but I did use my Nubar nail art pens a lot. Merry belated Christmas, and happy Boxing Day if you celebrate it!

Saturday, December 24, 2011

Candy Cane Nails

Hello there! I've had this mani on since Tuesday night, but I didn't get around to posting it until now because of doctor appointments and social stuff and such. I also had a really good haul Wednesday...maybe I'll post about that later (flakies!). Anyway, I'm posting this on my phone again, so there won't be any text after the photo. I decided to do a candy cane mani, and I used Wet 'n' Wild White Creme as a base and my red Nubar nail art pen (I used the striper end) for the stripes. For some reason, it chipped more quickly and severely than most of my manicures do...I tried a new base coat, so I'm hoping that wasn't what caused it. :/ Merry Christmas!