Showing posts with label rimmel. Show all posts

Monday, May 6, 2013

Red Gradient

Hey there! Today's my first post as a 20-year-old, and I decided that my birthday present to myself was going to be no homework or studying (except for the final edit of my paper this morning), so I've been watching Whose Line is it Anyway and painting my nails all day. :) The manicure I took off today was the one I'm showing you now - I made a red sponged gradient using Borghese Sonata Berry, Rimmel Rapid Red, and OPI Red My Fortune Cookie. I wasn't sure how well it would turn out, but I really liked the results.


I always forget how much I like dark red polish until I put it on...it somehow has the effect of immediately making me feel classier. Borghese Sonata Berry is the perfect dark red because it's dark, but not so dark that it looks black. With the other two reds added, I think it makes the perfect gradient! 

Monday, January 10, 2011

Spaced Out

Before I get into the polish, let me point out another spreadsheet I made listing the Essie polishes sold at Walmart, as well as treatments that will be coming in February 2011. As well as being linked in this post, the spreadsheet will be linked with the others in my sidebar.

This is officially my favorite layering manicure ever - at least out of those I've personally done. I wanted something similar to 
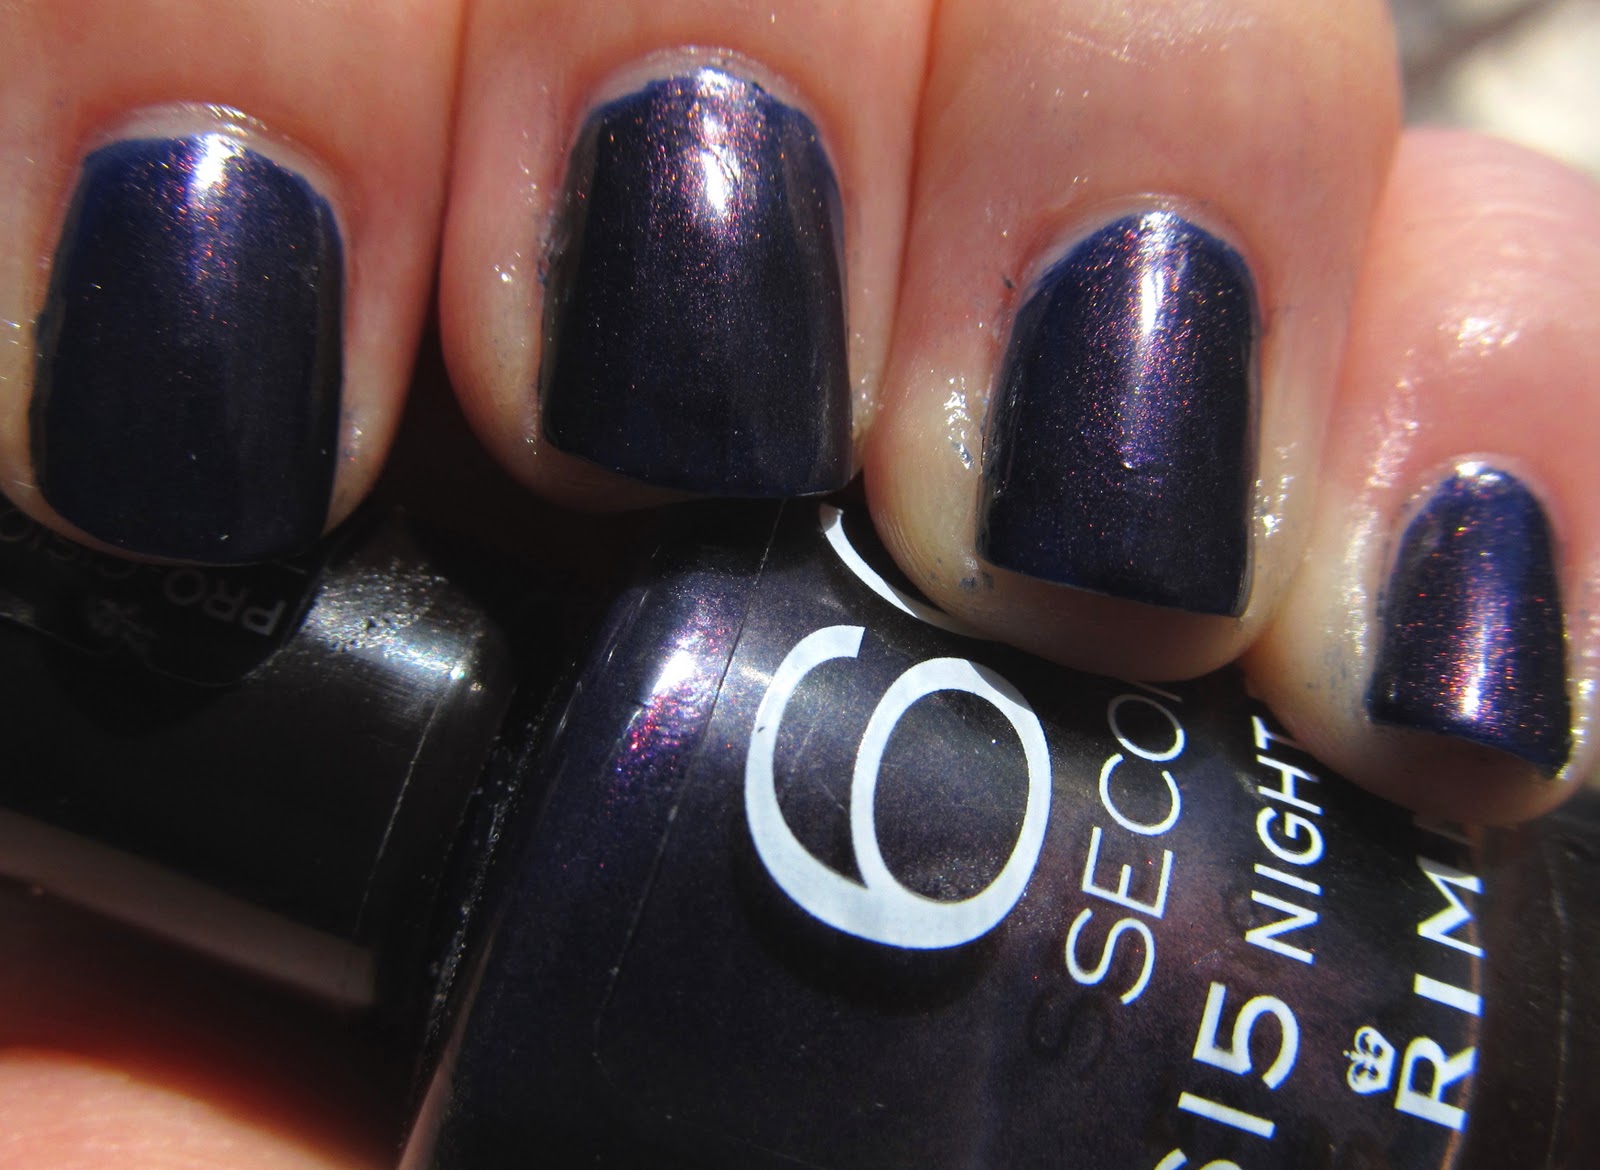
this, but I wanted something a lot more complex and "deep." Over two coats of Rimmel Night Before, I put one coat of Sally Hansen Laser, one coat of Sinful Colors Nail Junkie, one coat of NYC White Lights Glitter, one sparse coat of Sephora by OPI Only Gold for Me, and two coats of Rush to make it shine. I have to say, I'm absolutely thrilled with the results. One of the reasons I love nail polish is that you can do stuff like this with very little effort or skill:

indoors, artificial light

I can't entirely capture the gorgeousness of this combination on camera. There is still visible purple (though you can't see it in the picture), but with a blue flash thanks to Laser, and the green, blue, and gold glitter makes it look really stellar. I really hope this doesn't chip quickly, because I know that once it does, it'll have to come off - I can't stand chipped polish on myself.

I also have a tag to share with you today. I was tagged by Nail Polish Addiction Anonymous for the Stylish Blogger Award.


Here are the rules:
1. Thank and link the person who gave you this award.
2. Share 7 things about yourself.
3. Award 15 recently discovered great bloggers
4. Contact these bloggers to tell them about this award!

My seven things:
1. My mom's birthday is June 5 (6-5), and mine is May 6 (5-6). I think it's nifty. I also think that nifty is a weird word, and I'm not sure why I just used it.
2. I'm one degree of connection away from Bradley Whitford, who played Josh Lyman on The West Wing, my favorite TV show ever.
3. My first ever nail polish was a red The Little Mermaid nail polish that washed off with soap and water.
4. I am running out of interesting facts - that is, if I ever had any to begin with.
5. I have an entire (large) mug full of Sharpies. See #4.
6. I'm not anywhere near making up my mind, but I'm thinking about majoring in political science in college.
7. I love historical fiction and period movies.

And now, for my recently discovered bloggers. These were SO hard to pick...there are just so many great new blogs out there. ;) All of these blogs have existed for less than one year. In no particular order:

One of my friends was talking last week about how she wished she had some glittery nail polish, so I offered to bring some of mine to let her borrow. I'm taking my most glittery glitters and glitter top coats: OPI Mad as a Hatter, OPI Glow Up Already, Nicole by OPI One Less Lonely Glitter, Hard Candy Mischief, China Glaze Atlantis, OPI Extra-va-vaganza, OPI Simmer & Shimmer, $OPI Only Gold for Me, OPI Sparkle-icious, Simpli teal glitter, OPI Show It and Glow It, a Bon Bons blue bar glitter, Sinful Colors Nail Junkie, Finger Paints Holly Good Time, China Glaze Mummy May I, OPI Absolutely Alice, Icing Glamourama, Finger Paints Romanticism Ruby, Wet n Wild Kaleidoscope, NYC White Lights Glitter, $OPI Flurry Up, Sally Hansen In the Spotlight, and a mini of Orly In a Snap to smooth all that glitter out. Think she'll have enough to choose from? ;)

Saturday, January 8, 2011

Rimmel Night Before

Rimmel Night Before is one of those polishes that I have no clue where or when I got it - all I know is that I've had it for quite a long time. Night Before is a deep purple with gold shimmer, and while the base color isn't all that unique, the gold shimmer really makes it stand out. I kind of think of it as a darker sister to Zoya Zara (which I should really show on here sometime, seeing as it's my name). Application is quite good as well, and this is two coats.

indoors, artificial light
outdoors, sunlight
bottle shot - outdoors, sunlight

I couldn't get Night Before to photograph properly on my nails, but the last picture is a good example of what it looks like in real life. The polish has a subtle glow even in low light, and the shimmer looks even better in the sun. I'm not sure if this color is still a part of Rimmel's line or not, but if you can find it, I would definitely recommend getting it.

I'm planning on doing some layering over this, so expect to see that next. It'll probably be at least a little similar to my Rimmel Black Satin, SH Blue It, and Sinful Nail Junkie manicure.

Thursday, October 28, 2010

Night Before + Golden Enchantment

Battering tends to increase and become more violent over time.

I apologize for what I feel have been really crappy posts lately...I am so busy and I really wish I could devote more time to blogging and to reading blogs, but it's just not happening right now. Today I only have one picture for you because I was busy (and away from home) absolutely all day, and it's now pitch black out. I wore two coats of Rimmel Night Before as my Domestic Violence Awareness purple for the day, and added one coat of China Glaze Golden Enchantment on top:


That's all for today. Again, sorry for the inadequate post - I'm off to do scholarship applications!

Sunday, October 24, 2010

Ulta In the Mood

I was out of town yesterday and had the chance to go to an Ulta, so of course I did...and I only bought one polish! I was pretty proud of myself - though I have to confess that my small purchase was partly due to the fact that I only had $10 and wanted to stop by Sally Beauty Supply to get a dotting tool. Which I did. But anyway, the polish I chose was Ulta In the Mood, which was on clearance for $3. Yay! Even better, I love the color - it's a gorgeous purple-tinted greige creme. I used three coats, then added some dots (using my new dotting tool, of course) using Orly Enchanted Forest and Rimmel Hypnotise.

indoors, artificial light
 outdoors, shade
outdoors, sunlight

The first picture makes the polish look darker than it really is, but the third picture is fairly accurate, and the second is dead-on. Sorry my pictures aren't the best - I didn't think the sun was going to come out today, but when it finally did, I ran outside and took pictures without using cuticle cream...so forgive the frazzle? :) Enjoy the rest of your weekend!

Saturday, October 16, 2010

Angelic Camouflage

Depression can somatize, or become expressed in the body. 

I feel like this is one fact about depression that people find hard to believe - because it's classified as a "mental" disorder/illness/whatever, people don't think it can have physical effects. In my personal experience, though, the physical effects of depression can be as difficult to deal with as the mental effects. I have not suffered from severe depression, but I have suffered from mild depression, and it completely robs me of strength and has made me physically ill. So I guess my "message" for today is, don't underestimate what depression can do!

My depression awareness green today was Rimmel Camouflage, a green with gold shimmer. I don't have many Rimmel polishes, but I love the ones I do own, and Camouflage is no exception. It's absolutely perfect in two coats, and could probably be a one-coater for someone with better application skills than I. After two coats, I added two coats of Love My Nails Angel Baby. Unfortunately, I was away from the house this morning and napped the afternoon away, so by the time I got outside to take pictures, the sun wasn't shining directly on my yard anymore.

indoors, artificial light
outdoors, shade

The glitter looks kind of gross in the first picture...it does not look like that in real life, and I couldn't get a decent picture of it inside. Anyway, I really like this manicure - Angel Baby is a great addition to pretty much anything, in my opinion. I may not be posting as often in the coming week or so. Hopefully, I will be going back to school Monday, and I'll be really busy trying to catch up. My posting frequency on here will probably depend on how much I procrastinate. :) I hope you're all having a great weekend!

EDIT: Oh, I almost forgot! I'm integrating my "new polish blogs" post into my regular posts from now on. Here are some new and new-to-me polish blogs I've discovered recently and recommend:

Toes That Twinkle
Beautyburg
Polish and Powder
Similar Addiction
Tier's Thoughts
GildedNails
Persistently Polished
Chanson De Vernis

Thursday, August 12, 2010

Rimmel Black Satin

Very very quick post today, as I'm already supposed to be on my way. Today I'm visiting Washington University in St. Louis and Saint Louis University (SLU), which I'm really looking forward to. I wanted to wear a black creme after a recent post from Polish Police, so I grabbed Rimmel Black Satin. This is two coats with top coat.

shade, natural light (at my hotel window)

Please excuse my dry fingers; travel is not kind to them. Have a great day!

Sunday, July 25, 2010

Rimmel Rapid Ruby + Nailene Bedazzle Stickers

Rapid Ruby is an old, OLD polish from Rimmel's 60 Second polishes. I've had it for nearly ten years, so I did have to add several drops of nail polish thinner, and I think I may add a bit more. I added crown stickers from my Nailene Bedazzle* pack to my thumbnails and rhinestones from the same pack to my ring fingers, and I'm loving the combination! In these pictures I'm wearing base coat, two coats of Rapid Ruby, the stickers and rhinestones, and top coat.

my left hand, shade
my left hand, sun
my right hand, shade
my right hand, sun

All these pictures are pretty color-accurate. While Rapid Ruby doesn't look quite that bright in sunlight, it's close, and the pictures taken in shade are nearly spot-on. I love the combination of a classic red and a bit of royal bling - I may start asking people to address me as Your Highness (but not really). :)
The stickers were very easy to apply. I placed the stickers with the end of a toothpick and pressed them down with my fingers. I think I got them fairly well placed, though the one on my right thumb is slightly wonky. The stickers look really perfect - I can't see the edges of the stickers, there aren't any bubbles, and it looks like I actually painted the designs on my nails (excepting the fact that my designs wouldn't be that neat). The rhinestones are fairly bumpy, but they and the stickers have lasted through my morning hair-washing, so I'm pretty confident that they will last. I can't wait to use some of my other nail stickers! Here's what's in the rest of the pack:

clockwise from top left: rhinestones; butterflies and stars; flowers and butterflies; crowns, stars and royal-looking designs

*This product was provided to me by the manufacturer for review. However, this has not influenced and will never influence my review(s) - I will always say what I truly think about a product.

Wednesday, July 21, 2010

Color Accent Mani

Polish Hoarder Disorder has a nail design contest (EDIT: challenge, not contest - silly me) every week, and I finally decided to participate this week. As it says in the challenge post, "This week's challenge is to create a grayscale nail design and include a pop of color!" After experimenting with several different designs, I came up with this:


I used Pure Ice Kiss Me Here for grey, Sally Girl white for white, Rimmel Black Satin for black, and China Glaze For Audrey for blue. I painted the black tips freehand, and used a toothpick to do the zig-zags.. I'm very happy with this - my right hand does not look as good, but it's okay. I definitely need to practice making designs with my left hand, though.

Thanks for reading, and let me know if you've submitted anything to PHD's challenge!